Mathematics Developmental Continuum

Students are able to interpret the different notations used to represent scales on maps and plans, and can use appropriate ratio and proportional reasoning to convert between map measurements and corresponding measurements in the real world.
They may experience difficulty determining the correct factor and operation (multiplication or division) when working with scales, especially when decimal numbers are involved.
There are three ways that scale information is usually given on a map, and each of these has its own challenges.
A student has a map on which the scale is 2 cm = 5 km. Having measured the distance between two points on the map to be 7.5 cm the student does not know how to calculate the real world distance from this measurement. He/she does not know whether to divide by 5 and then multiply by 2, or divide by 2 then multiply by 5.
Reading maps is a real world skill, and so students should use real maps to answer real questions.
However, introducing the ideas can be done with specially designed situations for teaching, such as the desk map and mini island below.
Activity 1: Desk map uses a hands-on map-making activity to help students understand what is behind the concepts involved in scale diagrams.
Activity 2: Finding what to do by using easy numbers describes some explanation about analogous reasoning that teachers can use to help students solve problems.
Activity 3: Mini island describes two activities, one in the real environment and one simulating a real environment, that allow students to practice and check measurement and scale conversions.
Activity 4: Scale conversions allows students to develop familiarity with notation and practice typical calculations.
Activity 5: Know your district uses a real-world familiar concept to explore the meaning of ratio.
Students should make a careful scale map of some region, taking care with initial measurements, conversion calculations, and the final drawing. This map could be of an outside area or the classroom, but a quick and simple approach is to get students to make a 'map' of their desktop. This is a small area that can be measured quickly and accurately, and it is likely that there will be very few difficult angles.
Get students to place three or four objects on their desk. The map will be easier if the desk is rectangular and most of the objects are oriented parallel to the edges of the desk. Students take relevant measurements to draw a map of the desk top. To make it simple to begin with, a 1:10 scale could be used, with 1 cm on the map representing 10 cm of the desk top. To help students appreciate what the scale is doing and how the numbers are used in calculating, the teacher may give students a 10 cm × 25 cm rectangle of paper to be one of the objects on the desk. This gives students one object for which it is easy to work out what the scaled version is; they may be able to generalise this to their other objects with more awkward dimensions. A second map using a different scale could then be produced, perhaps 2 cm = 5 cm (which is 1:2.5).
If students work out how to scale the 10 cm × 25 cm rectangle they will be able to use the same calculations in general. Graph paper may help students in drawing their maps.
Having made the map, its accuracy can be tested by using the map to calculate a distance that hasn't actually been measured before now, such as between the corners of two of the objects. Students should measure this on their map, convert this measurement to a real-world distance, and then check by measuring on the desktop itself. Students could also check each others' maps in this way.
One way to help students decide what operation and what factor to use is to get them to generalise from a simple case where the operation is obvious.
Suppose, for example, that on a map where the scale is 5 cm = 1 km and the distance between two towns is 27.8 cm. How far this is in the real world? Some students may struggle to work out what operation to use. Here is a procedure, working first with sample numbers.
Forget the 27.8 for a moment, and just look at the ratio, 5 cm = 1 km. By using simpler numbers it should be possible to work out what operation to use.
If the measurement was 10 cm it's pretty obvious that the real world amount would be 2 km (assuming fluency with the 5 times table!). What's the relationship between 10 and 2? Well, 10 ÷ 5 = 2.
If the measurement was 15 cm, then that's 3 km, and note that 15 ÷ 5 = 3.
If it was 20 cm, then it's 4 km because 20 ÷ 5 = 4.
This helps to establish that dividing by 5 is what turns the measured lengths in centimetres into real world lengths in kilometres.
Some students may not need such a step by step approach; just asking what they would do if the length measured was 20 cm (instead of 27.8 cm) might be enough to trigger the required operation and factor.
For more information, Easy and hard ratio and proportion questions (Level 5.5) addresses the teaching of proportional reasoning concepts.
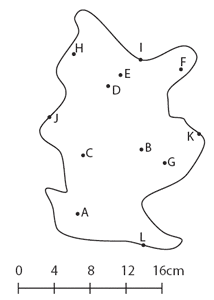
This activity gives students the opportunity to work with different scales and convert distances, and allows them to check their answers on the 'real world' object. The Mini Island resource sheet (PDF - 921Kb) has two pages and it is important that the sheets are printed on A4 paper, with no enlargement or reduction.
One page contains a picture of a 'Real World Island', which is a mini island represented at its actual size.
The second page contains maps of the island, produced at different scales (and each map uses a different way of representing the scale).
Students are asked to use the maps, with their scales, to work out the real world distances between various points on the island, and then they check their answers by taking the actual measurements on the Real World Island. In addition to straight line distances, students are also asked to work with curved lines.
As an alternative, the classroom teacher could prepare some different scale maps of the students' classroom so that the environment is more real for the students. To assist in producing multiple scale maps, calculated use of the reduction features of a photocopier can be applied to some original scale map drawn by the teacher (perhaps draw the first map at 1:50 (i.e., 1 cm = 0.5 m), and then reduce or enlarge this on the photocopier and work out the corresponding new scale). Get students to use the maps to determine distances between points of interest in the classroom, and then check the reality by actually measuring. If the measurements are left until the very end of the lesson, students' calculations could be recorded on the board, and incentives offered for those closest to the real distances (this relies, of course, on the teacher's maps being accurate!).
The Scale Conversion resource sheet (PDF - 513Kb) provides students with some practice converting among the different ways of describing the scale, and also converting distances.
Look at different scale maps of your district, or other familiar area. Explore how changes of scale affect the length measured on each type of map. In Melbourne, the Melway (or other similar publication) has sets of pages at different scales, especially depicting the central business district. In the case of the Melway, these sets of pages are bordered by different colours. There is usually a graphical (graticule) scale at the top of each page, and the Map Symbols page also indicates the ratio scale.