Congruence from Rotations and Reflections: 4.5
Supporting materials
Indicator of Progress
Success depends on students being able to identify shapes that are congruent by mentally picturing the transformations that will change one shape to another.
NOTE: transformations are rotations (turns), reflections (flips) and translations (slides).
Students may have difficulty appreciating the exact sense in which two congruent shapes are 'the same'. They need experiences that help them understand that what matters is that the size and shape of the objects is identical, but that orientation is not an issue for congruence. Students may also struggle to identify the orientation or position of the shape after it has been reflected or rotated.
Later, students also have difficulty identifying geometrically similar shapes when they are mirror images of each other. Teachers should be sure to include such similar figures in the exercises they use.
Illustration 1
The following shapes are congruent, because although they are oriented and coloured differently we can place one on top of the other so that the two coincide exactly (i.e., they are the same shape and size). In order to see this, we need to pick up one of the pieces, flip it over (reflect it), and turn it (rotate it).
Interestingly, if the two shapes were physical pieces, like blocks, students would find it very easy to pick up one and move it to place it on top of the other (anyone who does jigsaw puzzles does this all the time). In contrast, actually describing the process in mathematical terms or reproducing the effect with computer graphics is much more difficult.

Illustration 2
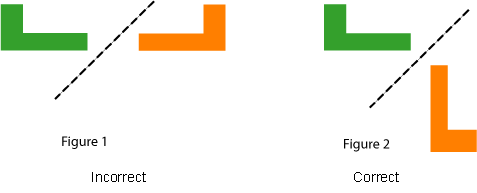
Many students have difficulty when the line of reflection is not vertical or horizontal. For example, if they are asked what happens when the left L shape is reflected about the dashed line, many will incorrectly choose the right-hand shape shown in Figure 1, rather than the correct right-hand shape shown in Figure 2.

Illustration 3
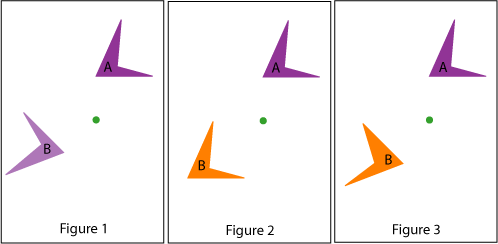
When working on rotation of shapes, students sometimes have difficulty determining the angle of rotation, or have difficulty maintaining the correct relative positions of the parts of the shape. The role of the axis of rotation is important. For example, if shape A is rotated 135° anti-clockwise about the green dot, the result is shape B in Figure 1. However, some students may believe that the shape B shown in Figure 2 is the correct answer (here the shape has been moved around the dot by 135° anti-clockwise, but the shape itself has not been rotated). Other students may have difficulty keeping track of the lengths and orientations of the edges of the shape, producing a response like shape B in Figure 3 (close observation reveals that the two arms of the arrowhead are different thicknesses from shape A, and/or the shape has also been inverted).

Illustration 4

Examples of the types of tasks that would be illustrative of visualising transformations aligned from the Mathematics Online Interview:
- Question 58 - Triads - using dynamics strategy with cards 1, 2 and 3
- Question 59 - Identifying shapes and creating a square using them
- Question 61 - Rearrange the square by visualising
Teaching Strategies
These activities are hands-on activities to give students practical experience to build up skills of visualisation. A major role for the teacher is to encourage students to reflect on their experiences. Students need to be encouraged to predict first and then check their predictions. Class discussion and writing also assists.
Activity 1: Reflecting shapes uses a hands-on activity to help students visualise the effect of reflecting shapes about a line.
Activity 2: The last Word on reflections and rotations takes advantage of accessible computer software to challenge students to predict the effects of various transformations and then test them.
Activity 3: Rotations and symmetry provides a hand-on activity to build conceptual understanding of rotational symmetry before giving students some further practice at identifying rotational symmetry.
Activity 1: Reflecting shapes
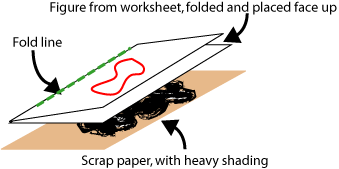
This activity uses folding to show the effect of reflection about a line. There are eight figures supplied on the Reflecting Shapes resource sheet (PDF - 1.1Mb). Each of the two A4 pages has four figures. The individual quarters of the paper should be cut up for the activity. Students will also need a scrap piece of paper on which they have shaded heavily with a soft 2B or 4B pencil, so that the shaded patch is a bit bigger than the figures they are working with. Supplementary shading may need to be added as the activity progresses.
For each figure, students fold the quarter of paper along the marked fold line, so that the shape is on the outside. They then lay it down so that the folded paper with the shape uppermost is on top, and the shaded scrap paper is face upwards under the folded paper, as shown below. Students draw over the outline of the shape, pressing firmly, so that the graphite on the scrap paper marks the underside of the folded figure paper. When the paper is unfolded the original figure and its reflected image about the reflection line can be seen (students may want to redraw this image as it may be a bit faint). Students should be encouraged to note the orientation of the image and its distance from the line of reflection. Students can also check that it really is a reflection by looking at the image of the original figure in a mirror placed on the fold line.

Note that similar activities with reflections (mirror images) can be carried out with MIRAs (red plexiglas mirrors that reflect and can be seen through).
Activity 2: The last Word on reflections and rotations
This activity lets students explore vertical and horizontal reflections and rotations using the simple transformation tools in Microsoft Word. Have students open a copy of the file Using Word for Transformations (Word - 41Kb), which contains a table of shapes. The first column contains original shapes. The second column contains copies of the shapes from the first column AFTER a rotation or reflection transformation has been applied. Students should select a shape from the first column, copy it, and then apply the appropriate reflection or rotation in order to get their copied shape looking like the one in the second column
Instructions on how to use Word's reflection and rotation tools are available here.
It is important to note that Word uses its own reflection lines and point of rotation (i.e., the user cannot choose them). The reflection lines run through the middle of the shapes (and only horizontal and vertical are possible in Word), and the centre of rotation is at the 'centre' of the shape.
NOTE: with purpose-built graphics illustration software it is possible to do more extensive activities than the ones presented here. Students interested in graphic design may use the reflection and rotation tools quite often when working with such software.
Activity 3: Rotations and symmetry
In this activity students investigate rotational symmetry.
- A shape has reflection (or mirror) symmetry if it can be reflected/flipped about a line in such a way that it looks exactly the same as it did before reflecting.
- A shape has rotational (or turn) symmetry if it can be rotated through a fraction of a full turn and ends up looking exactly the same as it did before the rotation (and by 'exactly the same' we mean that it even appears to have the same orientation).
There are two resource sheets for this activity. Finding Rotational Symmetry (PDF - 438Kb) allows students to explore exactly what rotational symmetry means. Each student will need two copies of the sheet, and should cut out the shapes on the first copy. After positioning one of the cut-out shapes on the corresponding shape on the second sheet, they should use a pin or pen-tip on the marked axis of rotation and rotate the cut-out over the top of the shape below. Students should also record the smallest angle (or fraction of a turn) that shows rotational symmetry.
The second resource sheet, Testing Symmetry (PDF - 453Kb), gives students practice (or testing) on identifying mirror (or fold) lines of symmetry and turn fractions for rotational symmetry.
