Mathematics Developmental Continuum

Students understand that a shape has line symmetry if a line can be drawn on the shape to divide the shape into two halves in such a way that when the shape is folded along that line the two halves correspond or match up. Equivalently, if a mirror is placed on the line then the view in the mirror looks just like the original shape.
Students may experience difficulty:
Folding and symmetry (Level 1.5) addresses the earlier progression of the understanding of line symmetry.
Congruence from rotations and reflections (Level 4.5) addresses information and concepts on rotational symmetry.
Students may not recognise lines of symmetry when they are not vertical or horizontal. For example, the arrow shown below has a line of symmetry, but the fact that it is not vertically or horizontally orientated means that students may not identify it.

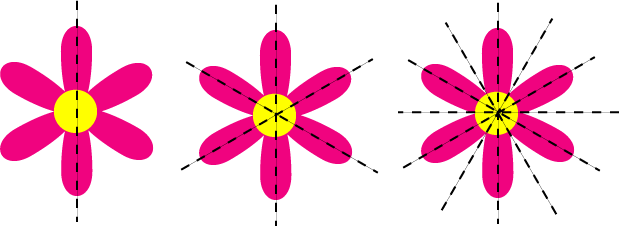
Students may think that a shape can only have one line of symmetry or may only identify some of the lines that are present. For example, some students may be able to see just the vertical line of symmetry in the flower shape below (as in the first diagram), whereas others will see the three lines shown in the second diagram. In fact, there are are six lines of symmetry, as seen in the third picture.
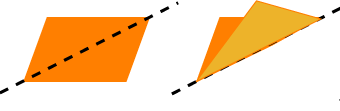
Students may think that all lines which divide a shape into two equal 'halves' are lines of symmetry. For example, in the shape on the left below the dashed line seems to divide the parallegram into two identical triangles. However, if the parallelogram is folded in half along this line the two halves do not match exactly, as seen in the second picture. This means that the line is not a line of symmetry. Equivalently, if you put a mirror on the line and look in the mirror from the bottom right, you will see the shape shown in the third figure. Since this is not the same as the original, this also means that the line is not a line of symmetry.
Activity 1: Using folding to test for lines of symmetry is a hands-on activity that allows students to explore the meaning of the concept 'line of symmetry'.
Activity 2: Identifying lines of symmetry is a diagnostic resource sheet that allows teachers to identify if students have misconceptions. It can also be used as a source of ideas for the range of examples that should be presented to students.
Activity 3: Symmetry in the environment allows students to relate ideas about symmetry to real-world examples.
Activity 4: Silly faces uses computer software to create pictures that reveal how symmetrical we are.
There are two sets of resource sheets for this activity. In the first, students test the lines drawn on a shape to determine if they are lines of symmetry. The Symmetry Testing Activity sheets (PDF - 49Kb) can be downloaded, and cut into pieces so that the shapes are separated (the individual shapes could be cut out, especially for the first few, but this may not be necessary after students have done a few examples). A number of different fold lines are marked on the shape.
Students fold the shape along each one in turn, to see if the two parts of the shape exactly coincide after folding. If they do, then that fold line is a line of symmetry. If the shape is not actually cut out, the students should fold the shape so that the printing is on the outside, and then can hold their shapes up to the light to see if they can see through the paper and find lines on the other side that don't match. If there are parts of the shape that don't match then the line isn't a line of symmetry. A solution sheet (PDF - 49Kb) for teachers is available.
After students have had some experience with this activity, they should be encouraged to predict which lines they think are lines of symmetry before actually testing. Note that not all of the lines of symmetry are shown on the shapes, and so students could be asked if they think there might be more lines of symmetry.
If mirrors are available, or the special MIRA reflective equipment, place a mirror on each line to see if the shape viewed in the mirror is the same as the original. If it is, then the line is a symmetry line; if not, then it isn't a line of symmetry.
The second resource sheet, contains shapes with no lines marked (PDF - 418Kb). Students should suggest lines that might be lines of symmetry and then test them by folding. They should be encouraged to find as many lines as possible on each shape. An answer sheet (PDF - 437Kb) is available.
In this activity students mark in all the lines of symmetry that they can find on a number of shapes in the Symmetry resource sheet (PDF - 24Kb). This provides students with extra practise finding lines of symmetry and also allows teachers to diagnose whether or not students have any of the typical misconceptions. This sheet can also be used as a source of ideas for the range of different shapes that students should encounter when investigating line symmetry. Solutions (PDF - 44Kb) are available, with comments to help teachers diagnose typical errors.
Students should be encouraged to look for examples of symmetric shapes in their environment and to identify the lines of symmetry. A digital camera is an ideal way of recording such examples, and the lines of symmetry can be marked on a printout of the pictures. Examples of symmetry can be found in plants (e.g., flowers, seedpods, fruit), business logos, buildings and bulding materials.
Photo software can be used to manipulate photographs of individuals' faces to see if faces really are symmetrical. Copy one half of the face, and then reflect or flip that half to make an opposite half-face (a new right-hand side). Line up the new right-hand half with the original left-hand half, and see what happens. Repeat with the other side.