Mathematics Developmental Continuum

Students appreciate that angles can be viewed both statically and dynamically.
Their first experiences of angles are likely to emphasise the static nature of angles, such as the corner of a desk. Students also need experiences that will highlight the dynamic nature of angles, such as measuring amount of turn.
Before this, students may see an angle as a corner (e.g. of a triangle) and focus on the visual appearance rather than the amount of turn.
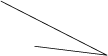
Give students two diagrams (or two objects) with equal angles, but one with much longer arms (or edges). Ask Which is the larger angle? Students who choose the angle with the longer arms do not appreciate that angles measure the amount of turn. They are looking at the overall picture of the angle instead.
 |
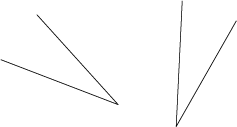
Students with a strong concept of angle as amount of turn will be able to identify the angle, against a variety of distractions, such as unequal arm lengths, or different orientations.
|
Unequal arm lengths
|
Different orientations
|
|---|---|
 |
 |
![]()
Examples of the types of tasks that would be illustrative of identification of angles skills, aligned from the Mathematics Online Interview:
The following activities focus on developing students' understanding of angles as measuring the amount of turn. The teaching strategy is to use real objects, our bodies, or computer technology to create the dynamic sense of angle as amount of turning. Students then make the link to the static image on paper.
Activity 1: Emphasise that angles are associated with amount of turn. This task involves making angles using different materials, including our bodies.
Activity 2: Uses technology to make and change angle size.
1. Making angles with your body
Start with students standing with plenty of space between them. Ask them to make an angle with their arms. With right arm out sideways, move your left arm to make a very small angle, then a wide angle, then a straight angle, then a right angle. You could model the actions. Note that the vertex of the angle will be in their own bodies, as the arms do not meet at a vertex!
2. Simon Says
Play Simon Says, using fractions of turn. Instructions might be: (Simon says) quarter turn (clockwise or anti-clockwise), half turn (clockwise or anti-clockwise), and when they are able, smaller fractions, such as one-eighth. This can be done with one arm held straight out in front, so that they can ‘see’ the angle as a dynamic turning.
3. Making angles with a door
Opening and closing a hinged door – is the door open enough to fit the chair through? No, we need to turn the door through a wider angle.
4. Making angles with materials
Use popsticks and pins or plastic geostrips.
5. Making angles with rotagrams
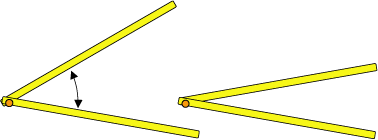
A rotagram consists of two sheets of clear plastic that are connected at one central point. One arm, or ray, is drawn on each sheet, so that spinning the top sheet produces angles of various sizes. As the sheets are transparent, students can place a rotagram on top of any drawn angle or object and copy the angle with the rotagram. Angles can then be compared, without the need to assign numbers (degrees) to the angles.
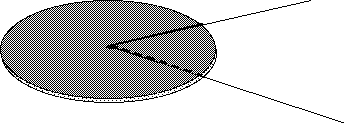 |
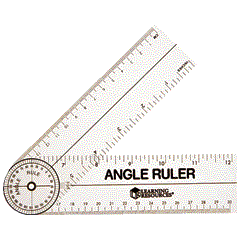
6. Making and measuring angles with Angle Rulers
These rotating rulers incorporate a protractor and can be used to both make and measure angles. While the standard protractor measures angles, the Angle Ruler emphasises the dynamic nature of angles, which the standard protractor does not. The Angle Ruler can be opened to 180 and used as a normal 30cm ruler. This highlights the fact that 180 is a straight angle, as it is only in this position that the ruler can then be used to draw straight lines. Angle rulers are available from Educational Experience, www.edex.com.au.
 |
Note to teachers: This activity includes numbers that refer to sizes of angles in degrees. Measuring angles in degrees is listed in the Measurement, chance and data dimension at progression point 3.50. It is appropriate to use this activity as an introduction to that concept.
1. Walking and turning through an angle
Students walk forward a few steps, stop and turn left. If they hold an arm out as they turn they will now realise that this is a quarter turn, which you can define as a ‘right angle’ or 90°. Similarly ‘about turn’ is a ‘half turn’ and this is 180° or a straight angle. You could introduce turning through ‘half a right angle’ or 45°, and other variations.
2. Using Micro Worlds
If you have access to Micro Worlds or Logo in your classroom, students could construct Turtle angles, e.g., pd fd 150 bk 150 rt 60 fd 150 bk 150 , where rt 60 means that an angle of 60o is drawn. Students can experiment with other angles to see the effect on the turtle.
For example, how many times does the turtle have to turn by 60o to be back facing in the same direction. The turtle makes an early introduction to angles up to and beyond 360o
Students will see the link to the walking activity above. The angle through which the turtle turns is not the same as the angle drawn on the screen.
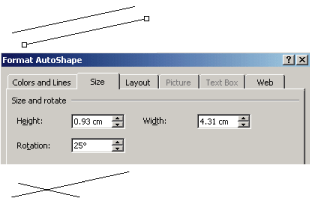
3. Using drawing tools in Microsoft Word or Power Point
Draw a segment, copy and paste it, then use the Free rotate tool to rotate one of the segments.
 |
Rather than using the Free rotate tool, angles with specific sizes can be constructed. Draw a segment, copy it and paste it. Then select one of the segments, go to Format, Autoshape, Size and enter the required angle size, for example, 25o as shown here.
 |