Mathematics Developmental Continuum

Success depends on students being able to identify the important features of two-dimensional shapes and use these distinguishing features to compare and contrast various shapes.
For example, they should appreciate that triangles have three straight sides and the three angles can be of various sizes. Furthermore, that rectangles (and squares) have four straight sides and four right angles and that these are special 'quadrilaterals' (four-sided shapes). Other quadrilaterals have some features in common with rectangles (and squares). A parallelogram looks like a 'pushed over' rectangle, and a rhombus looks like a 'pushed over' square.
At this level, it is important that students know common geometric names (e.g. rectangles, squares, circles, triangles). Other names can come later but learning names should not be the only focus of geometry.
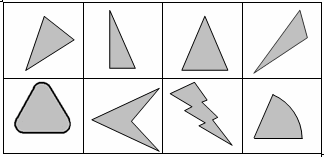
Students who are not clear on the important features of triangles (three straight sides) may not realise that the shapes in the first row are all triangles, while none of the shapes in the second row are triangles.
Similarly students who are not clear on the important features of rectangles (four straight sides and four right angles) may not realise that the shapes in the first row are all rectangles, while none of the shapes in the other rows are rectangles. Note that two of the rectangles in the first row are 'special rectangles'; as well as having four straight sides and four right angles, the four sides are the same length, so these special rectangles are known as squares.
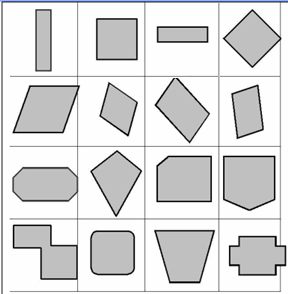
In the diagram above, the second row contains four 'pushed over rectangles' or 'parallelograms'. These four-sided shapes are similar to rectangles in that the opposite sides are the same length, but the angles are not right angles.
Of the four parallelograms in the second row, the first two have equal-length sides and so are 'special parallelograms' known as rhombuses. They could also be thought of as 'pushed over squares'.
![]()
Examples of the types of tasks that would be illustrative of shape identification skills, aligned from the Mathematics Online Interview:
The teaching strategy here is to focus students' attention on selected features of shapes by having them sort a set of shapes. Key elements of the strategy are:
Activity 1: Introduce the shapes follows this pattern. The small group work should encourage students to verbalise their thinking and to debate their ideas.
Activity 2: Make a poster provides an opportunity for students to carefully explain their sortings in words.
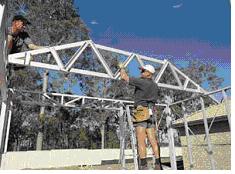
Activity 3: Explore rigidity of triangles draws attention to a rigidity or stiffness, which is important in the world around us.
This activity uses two resource sheets (Sheet A (PDF - 21Kb) and Sheet B (PDF - 19Kb)), which each contain 24 shapes. You might choose to use the full sheets and provide copies for each student or make a reusable set by printing, laminating and cutting the sheets into pieces. In this case, you might select only some of the shapes for certain activities. The focus of the activities is to use appropriate language to describe and sort these shapes.
Students work in pairs or small groups. They cut up each sheet to make 24 cards (48 cards in total) and then sort the shapes into two or more sets according to a criterion they choose themselves.
Have students discuss how they grouped their shapes and encourage them to use appropriate language. They might sort the shapes according to:
The students sort shapes from the two resource sheets (Sheet A (PDF - 21Kb) and Sheet B (PDF - 19Kb)) into subsets according to new criteria created by students or teacher. Once the shapes have been sorted, they could be pasted onto poster paper with explanations for a more permanent display.
Guide students through this activity:
The following resource contains sections that may be useful when designing learning experiences:
Digilearn object *
Face painter: finding faces 1 – students identify polygons on a range of prisms and polyhedra such as a cube, square pyramid or triangular prism. They picture in their head all sides of a solid. Students estimate how many faces the object has. They rotate it to see all of its faces.
(https://www.eduweb.vic.gov.au/dlr/_layouts/DLR/Details.aspx?ID=4900)
* Note that Digilearn is a secure site; DEECD login required.