Mathematics Developmental Continuum

The teaching challenge here is to make these spatial activities into highly productive learning experiences for students. The spatial awareness generated by making attractive designs and solving puzzles needs to be brought to the foreground through discussion with the teacher, and well planned activities that focus attention on selected ideas. To improve students’ spatial skills, it is essential to have practical experiences, discussion, questioning and reflection.
Ideas of length are already reasonably well developed by this level, and students will already be able to measure. However, here they can use knowledge of equal lengths in context.
The concept of angle is just developing, so these activities use teaching strategies appropriate to the phase of ‘identifying the attribute’ . Through practical activities, students will come to identify the appearance of the corner of a shape (later quantified as ‘angle’) that determine whether shapes fit together in the desired ways.
At this level, it is sufficient for students to describe the corner in comparison to the corner of a square (a ‘square corner’) using informal descriptions that students create for themselves, such as ‘pointy corner’ (less than a ‘square corner’; roughly corresponding to an acute angle) and ‘blunt corner’ (more than a square corner; roughly corresponding to an obtuse angle). Students are not using precise language about angle at this level. The concept of angle as a rotation of a line is not developed until Level 2.75, so at this stage students are only responding to the visual aspects of the corner of the shape and do not make fine distinctions. They talk about ‘corner’ not ‘angle’.
Activity 1: Pattern blocks uses readily available commercial material, to increase students’ awareness of angle (as the corner of a shape), and improve spatial skills
Activity 2: Tangrams are ancient puzzles requiring spatial reasoning for solutions. They can be adapted to suit different levels of ability.
Activity 3: Tessellations has students constructing special patterns.
Activity 4: Shapes in Patterns provides a series of resource sheets that allow students to focus on how shapes combine, how patterns continue, and identifying 'square corners'.
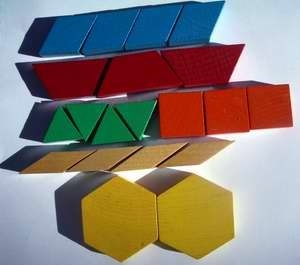
Sets of pattern blocks commonly include many copies of squares, equilateral triangles, regular hexagons and half hexagons (also called trapezia), and different parallelograms, with corner angles 30°, 60°, 90°, 120° and a constant side length. They are very attractive and have many uses (e.g. for making tessellations as in Activity 3) and other patterns as here.
Students should use correct geometric names for the shapes (e.g. square, hexagon), but naming is not the main focus here. In this activity it may be more convenient for students to refer to the shapes by colour.
Step 1: Introduce pattern blocks
Begin with a short time allocated to play, so that students familiarise themselves with the equipment. If you don’t allow some time for play, students will do it anyway. These are enticing materials, and students will immediately have things that they want to do with them.
Step 2: Describe the pieces
Students draw, talk or write about each piece (e.g. colour, size, shape, number of sides, number of corners and what its corners are like). Examples:
Step 3: Making patterns and solving puzzles
Students can make patterns (e.g. tessellations as in Activity 3) or many other designs as in the examples below. To improve students’ spatial skills, it is essential to have both practical experiences and discussion.
Can you make a line, using blocks of only one type?
Students will note that they can make a line of blocks with all but the yellow blocks (hexagons).
They may also note:
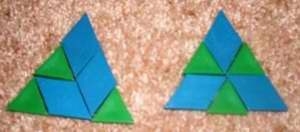
Can you make a triangle using only blue and green blocks?
“The angles of the triangle have to be made with the pointy corners. The pointy corners of the green and blue blocks are the same size. The sides have to be straight, so you can have either 3 pointy corners, or you can have a blunt blue corner and 1 pointy corner.”
[This task can be made easier by giving students an outline of a large triangle of the correct size, on which they can place the pieces. This is also effective for the examples below].
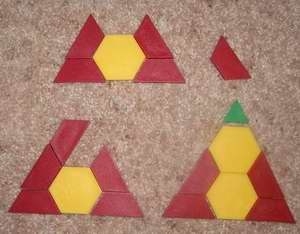
Can you make a triangle using only yellow and red blocks?
“I can make straight sides by putting together the yellow and the red (a blunt angle and a pointy angle).
I can also make straight sides by putting two red blocks together. I can only make the angles of the triangle from the pointy angles of the red. I can’t make a triangle, but I could if I used a green on the top.
I can’t make a square out of these shapes because I cannot make a square corner”.
Can you make a square out of three types of blocks?
“I tried to make a square out of green, white and blue blocks. I can make the square corners from the pointy corner of a white block and a green block. I tested it by putting a square on the top. The sides are all the same length so that they match up. But I cannot make the straight sides stop and turn in the proper direction”.
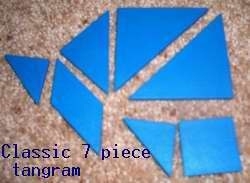
Tangrams are famous spatial puzzles. The classic tangram has 7 pieces to be arranged into one square, but they can also be arranged to make many other figures. Tangram kits usually contain booklets with many possibilities.
Step 1: Allow students some free play to familiarise themselves with the pieces.
Set a few easy tasks, such as making a square with 2 pieces, making a rectangle with 3 pieces, or making an easy figure from the tangram booklet.
Step 2: Students describe the pieces, including the lengths and corners (angles). At this level, they can use correct names ‘square’ and ‘triangle’, but an informal name for the parallelogram (e.g. ‘slanting piece’) is acceptable.
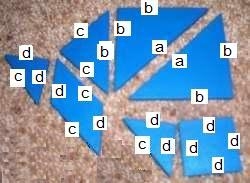
For the corners, students can see that there are 9 ‘square corners’ and all the ‘pointy corners’ are the same size. Two of the pointy corners make a square corner.
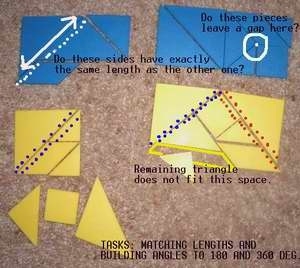
The image on the right shows the lengths that are equal. Students could make a drawing of the pieces, and mark the sides in different colours according to the length. Some students at this level may not be sure that the hypotenuse is longer than the sides of a right-angled triangle until they match.
Step 3: Set students tasks such as making a rectangle with all pieces, making a square with all pieces (difficult) or making figures from the tangram booklet.
In these tasks, students will constantly need to ask themselves whether a combined length exactly makes another length (see diagram), whether corners fit together exactly and whether a boundary made by joining pieces is really a straight line.
A tessellation is a pattern that fills the whole plane, without any gaps or overlaps. The same pattern can be continued indefinitely. Students do not need to know the word ‘tessellation’ until they are working towards Level 4. Whilst some teachers may like to introduce this word to some students, it is acceptable at this level for students to talk about patterns that continue without any gaps. Learning vocabulary is not the main focus of spatial work.
Students observe tessellations in the world around them (e.g. tiling patterns on the floor, brick walls etc) and they can make tessellations using blocks. By Level 4, students will understand that a requirement for shapes to tessellate is that the angles at each point add up to 360 °. At this earlier stage, however, it is enough to observe that shapes do not tessellate if the corners do not fill all of the space around the point. (For example, the corners of 6 triangles and the corners of 4 squares fill all the space around a point, but, as shown below, the corners of a regular pentagon are not ‘blunt’ enough for 3 of them to fill the space and too ‘blunt’ for 4 to fill the space).
Using sets of blocks (like the pattern blocks), students can experiment to make tessellations with only one shape, or with only two shapes or with only 3 shapes.
For each tessellation that they make, students should record what they have done (with a drawing or a digital photo) and answer the following questions:
Students can take some pieces out of the middle of their tessellations and challenge their partners to fill in the gaps correctly. Some tessellations are hard to discover, so students can copy these from a picture. In doing this, students will need to flip and rotate pieces to get the correct orientation, as well as keep track of where they are in the pattern.
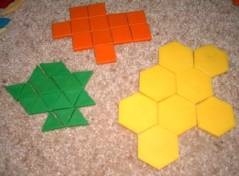
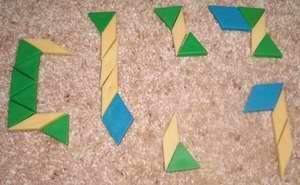
These 3 tessellations can be made with only one type of block
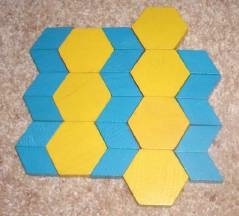
This tessellation is made from hexagons and parallelograms.
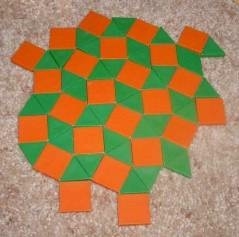
Students can copy this tessellation, made from squares and triangles, from a picture.
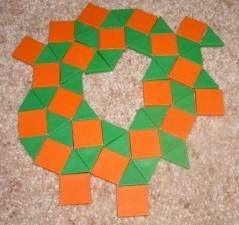
Students can remove some blocks from the middle of a tessellation and challenge their friends to put them back.
A number of resource sheets have been provided that focus on helping students to recognise shapes and how they combine to make patterns. These are listed below:
For Fitting Shapes Together indicators of progress, see: Part 1