Mathematics Developmental Continuum

Teaching measurement is largely a practical activity. Students should measure real objects with real instruments. Many classroom measurement tasks will arise in the context of other classroom activities (e.g. organising the school play) but it is important that time is made in such activities to teach students to measure correctly. The activities below particularly highlight difficulties with ‘zeroing’, parallax error and reading scales, which is just begun at this level.
It is important that students have had a good foundation in informal units before they move to formal units. In addition, careful instruction about instrument use (e.g. how to use a ruler) together with carefully designed measurement diagnostic activities can help students avoid typical errors. Finally, students benefit from having a personal appreciation of the size of certain key measurements. These activities focus on length but similar activities can be devised for other attributes.
Activity 1: Moving from informal to formal units gives some guidelines and suggestions for natural ways to move from informal to formal units.
Activity 2: Using measuring instruments for length highlights important principles to focus on as students begin to measure length using formal units.
Activity 3: Diagnosing errors can be used by teachers to determine quickly if students are using a measuring device incorrectly.
Activity 4: Body benchmarks for length allows students to have a personal appreciation of the magnitude of different lengths.
Activity 5: Using measuring instruments for mass highlights important principles to focus on as students begin to measure using formal units.
Activity 6: Using measuring instruments for capacity highlights the important principles to focus on as students begin to measure using formal units.
A careful choice of informal units for measuring can provide a bridge to formal units. Some suggestions are listed below.
Length
Use 1m lengths of ribbon as an informal unit for long lengths (e.g. width of room, length of large table).
Use MAB longs and minis to measure smaller lengths. The MAB long measures 10cm in length, and its use will encourage both place value understanding and a foundation for future work with cm. Although MAB minis could be used on their own, the use of the MAB long as well will really reinforce the attribute of length as it is, itself, a long object.

A trundle wheel can be used to measure length by how many ‘clicks’ it takes to cover it. Later, it can be demonstrated that each revolution, with its resulting click, measures one metre. So first a student may say, “The corridor is longer than the play area because the trundle wheel clicked 7 more times” and later they can say “I used the trundle wheel to find that the length of the corridor is 25 metres”.
Mass

Most commercial plastic connecting centicubes (see accompanying photo which shows 50 centicubes) have been designed to weigh one gram each. These can be used as informal units when measuring mass (“this pencil weighs as much as 34 centicubes”) and later can be used for measuring in formal units (“this pencil weighs as much as 34 centicubes, so the mass is 34 grams”). Joining together sets of 10 makes a convenient 10 gram mass, which can be broken apart if required.
Important note: Check your centicubes before use to ensure that they really weigh 1 gram. The three different types in the photo (with square, diamond, and slotted connectors) all have this property.
Capacity
Use 250mL drinking cups as informal units for capacity. Four of these will fill a 1L container.
Measuring instruments must be used properly in order to obtain accurate results. Some of the principles of instrument use should be taught explicitly to students. The lists below highlight particular aspects that may cause difficulty.
Reading the scale
One general issue that is particularly applicable to instruments with a scale on them (e.g. rulers and bathroom scales) concerns how accurately to measure, and what to do about the smaller increments on the device (e.g. mm on a ruler and parts of a kilogram on a set of bathroom scales). Teachers should have an explicit discussion about this. For beginning activities with measurement it is best to measure things where it makes sense to work with whole and perhaps half units. For example, a desk could be measured to the nearest cm or half cm, but it might not be appropriate to measure the 8mm distance between ruled lines on a piece of paper.
Demonstration of correct methods, followed by supervised practice, will help students become more facile in their use of the instruments. Class discussion of what problems arise when the measurement tools are not used correctly can help students understand why they need to be careful.
Rulers
When measuring length make sure that 0, rather than the end of the ruler, is lined up with one end of the length to be measured. Some students may also measure from the wrong end of the ruler.
Help students avoid what is known as ‘parallax error’ by making sure that their eye is directly above the ruler where it reaches the end of the object being measured. If they are looking from an angle the reading may be inaccurate.
If using a tape measure, check where the 0 is (unlike a ruler, sometimes the 0 is right at the end of the tape measure). An example is shown in the figure on the left below. Note also that it may be hard to tell which numbers match with which main increment mark (see the tape measure on the right).


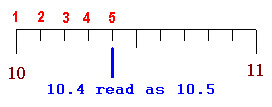
Later, when they progress to more complicated measurements such as reading off the mm values on a ruler, some students may count the increment marks (tick marks) between the centimetre values incorrectly. Instead of starting from 1 at the first mm mark past the whole centimetre (i.e. with 0 at the whole centimetre mark), they count 1 from the centimetre mark itself. This may lead them to read a length of 10.4 cm incorrectly as 10.5 cm.
Students will need specific instruction about how to measure lengths that go beyond the length of the available ruler. The importance of marking where the endpoint of the ruler reached, and then ensuring that the 0 on the ruler lines up with this mark when the ruler is moved, must be stressed. For some measurements using a finger to mark the end/start position may be adequate, but for really accurate measurement more care will be required.
Students will also need to learn how to measure curved lengths and have the opportunity to do this. For example, a piece of string can be placed around a vase to measure its circumference. Students may be able to propose other suitable methods themselves, and their effectiveness, useability and accuracy can be discussed.
Trundle Wheel
Help students learn how to set up the trundle wheel so that it makes one full revolution before the first click. This means the first click will measure 1m.
As mentioned in Activity 2 there are common problems in using measuring instruments. The following suggestions can help teachers to diagnose some of these for length measurement.
It is useful if students have an appreciation of the magnitudes of different lengths and can readily make approximate measurements. To this end, students should be encouraged to learn some key measurements of their body. Suggestions include their height, their hand span, the length of their index finger, their belly button height, and their arm span.
Students should also find and remember some convenient body benchmarks for certain key lengths such as 1cm (length of fingernail or width of finger?), 10cm (hand width?), 20cm (length of foot?), 25cm (elbow to shoulder?), and 1m (belly button height or a very long pace?). Of course, there should be discussion about how these benchmarks will change as students grow. Students can make approximate measurements using these body benchmarks (e.g. “A blue whale can be 25m long. I paced out this length and found that it would stretch from the canteen to the corner of the library”; “My foot is 15cm long, so I did ten ‘lollypops’ [heel-to-toe] to measure where the new sandpit will come to”).
There are at least two interesting relationships between body measurements that can be investigated: (1) height is generally close to the fully stretched arm span, and (2) the length of a foot is about the same as the distance from the inside bend of the elbow to the wrist (i.e. the inside forearm).
Measuring instruments must be used properly in order to obtain accurate results. Some of the principles of instrument use should be taught explicitly to students. The lists below highlight particular aspects that may cause difficulty for mass.
Pan Balance
Make sure that the pan balance is balanced when the pans are empty, before any mass is added to either side. There should be a mechanism (e.g. a screw or a slider) on the balance that allows the pan balance to be adjusted until the two pans are level with each other. This is known as ‘zeroing’ the balance. In the pan balance below, which shows 50 centicubes balancing a 50g mass, the two bolts in the slots of the arms must be slid to the left or right to get the pans level BEFORE objects are placed in the pans.

Scales
Just like the pan balance, sets of scales such as bathroom or kitchen scales should also be ‘zeroed’ before use. There will be a mechanism (a knob or similar) that allows the scale to be adjusted so that it reads “0” when there is nothing on the scales. The photos below show a correctly and incorrectly adjusted set of kitchen scales.

Parallax error is also an issue on bathroom and kitchen scales. To read the scale, make sure that the scale has settled and that it is viewed from directly above. In the photographs below the one on the left is viewed correctly from above and shows about 46kg, whereas the one on the right is viewed from the side and, as a result, gives an erroneous reading of 47.5kg.

Many bathroom and kitchen scales have metric and imperial units on the scales (see the photos of the kitchen and bathroom scales above). Help children learn that they need to figure out which scale is the one they need; it may also be appropriate to have a discussion about ‘old’ imperial units. Children who follow sport such as basketball probably know weights and heights of famous American players in imperial units.
If using a measuring cylinder, ensure that the container is level before reading the measurement for the amount of liquid. The eye should be level with the level of water to avoid parallax error.
Technically speaking, the surface of liquids in a narrow cylinder will generally have a curve or meniscus that is low in the middle. When measuring capacity we read the value at the bottom of the meniscus. This need not be discussed at primary school level, although some students may notice the meniscus and wonder about where to read the value.